
 |
| The finished product |
I decided this would be a good opportunity to document my process so I dug out the tripod, cleaned up my work bench, and snapped away as I worked. I have been doing this for a little over a year now in a studio under the stairs at Acme Garage in Kearny Mesa. I learned to Silversmith from Deanna Jacobsen in a seven week course at the Art Academy of San Diego in North Park. Deanna was a fantastic teacher and really let me explore techniques she usually saves for her Silversmith II class.
Ok, enough history, on with the big show!
Usually I begin my process with a sketch. Something for simple reference is really all I need.

.................................................................................................................
I already had an idea bouncing around in my brain, so this part was easy. Next I drew out the wolf shape in more detail, cut it out and glued it with decoupage paste to the 24 gauge copper sheet.

.....................................................................................................
After the paste dries I use a coping saw to cut the shape out using the paper as my guide. I cut detailed shapes this way because its easy to make mistakes with the coping saw. Also, after I peel the paper pattern off I can save it for later use.
Beeswax is used as a lubricant to help the saw cut through the metal more easily.

.....................................................................................................
Howl do you do?

.....................................................................................................
Next I cut out my moon. Working within an auto garage has many benefits, including tons of tools at my fingertips! I like using my husbands sockets to trace large circles. After tracing comes more sawing. This silver sheet is 22 gauge, a little thicker than the copper I used and less likely to bend accidentally once the piece is finished.

..................................................................................................
My wolf and moon cut outs are cleaned up with various files. Sharp edges are softened and the moon is rounded.
My circles are never perfect after sawing so I do a lot of filing, which makes my hands tired.

......................................................................................................
Next I use sandpaper to even out the surface and clean up any excess roughness.

.........................................................................................................
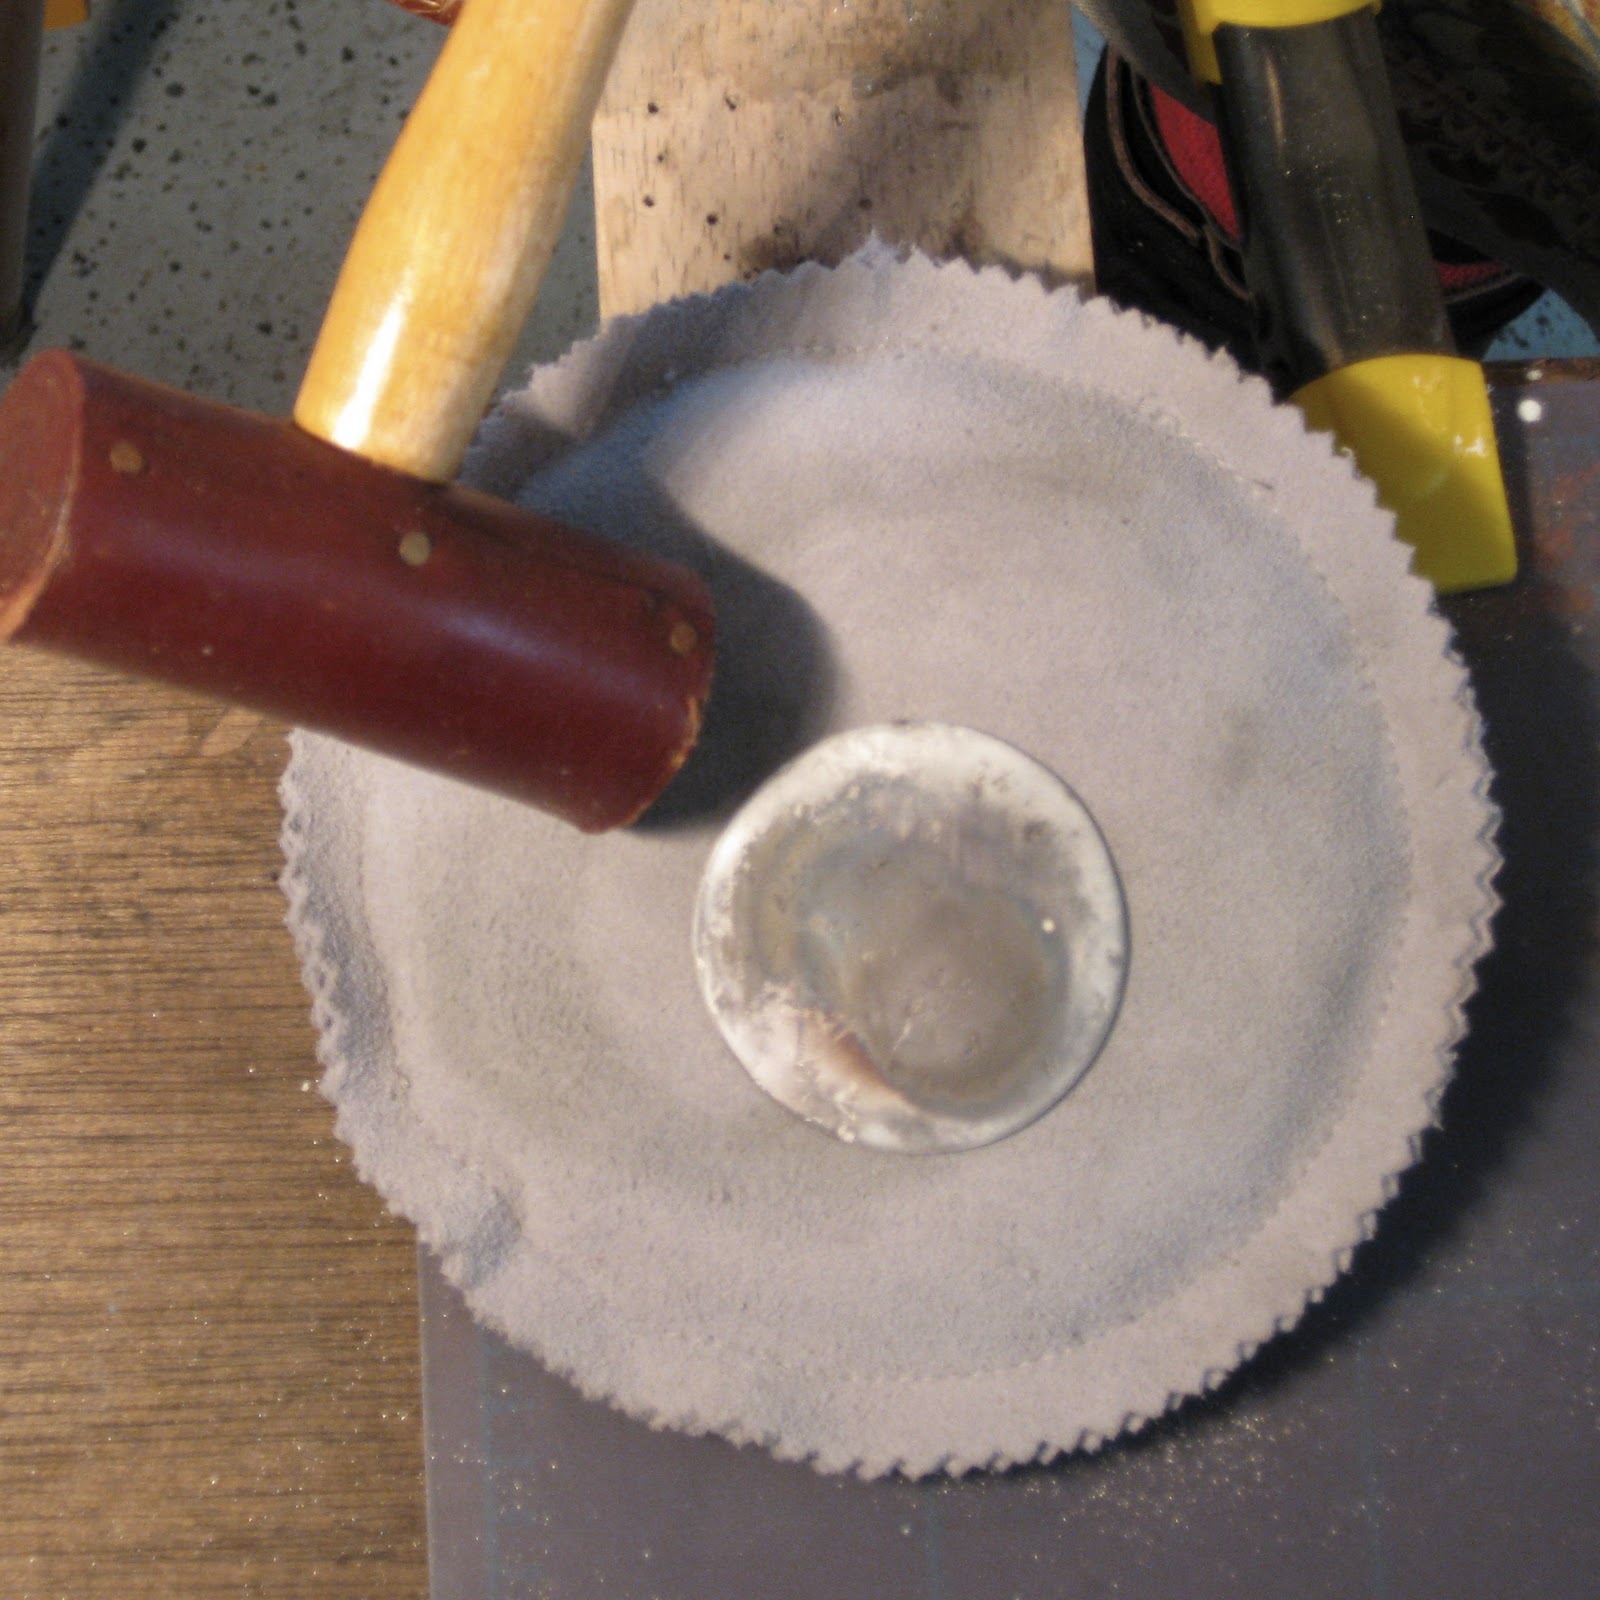
I love making moon texture. You can't get it right without concrete or asphalt which ensures a random pattern of texture. Here I am smacking my fingers more than the silver disc with a chasing hammer. ouch!

............................................................................................................
Moon texture complete (compare)

..........................................................................................................
After a satisfying pounding, its time to anneal my moon to pound it into a concave dish-like shape. Annealing makes the metal softer and more workable. I heat the metal with my Little Torch using a mix of propane and oxygen. Once the metal glows cherry red I quench it in water to cool it quickly. I heat metal using a firebrick to absorb the heat, protecting my work surface from the torch and the super heated metal.

............................................................................................................
On a suede pounce bag full of sand I pound my metal disc (with a heavy ball peen hammer, not this rawhide hammer!) until I have a nice concave shape.
.........................................................................................................
I throw the pounded metal in the pickle pot to clean off the fire scale and skin oils to prepare it for the next step. Pickle contains sodium bisulfate and has burned holes through my cute Anthropologie aprons. I use long copper tongs to fish my metal out and wash my hands and the metal immediately using soap and a wire brush.

..........................................................................................................
Here I am placing solder chips on contact points where the copper and silver will be sealed together. Flux is painted on first and acts as a glue to hold the pieces together while I work. Its real purpose is to help the solder flow when heated.

...........................................................................................................
Again I use my Little Torch starting with the flame about 6" directly above the metal heating it slowly so my solder chips don't fly off when the flux bubbles. I use a slow circular motion moving closer to the piece to heat the metals evenly, otherwise the flux will flow only onto the copper which heats faster since its smaller and finer gauge. Once I see the shimmer of flowing solder I remove the heat source and send it back to the pickle.

.......................................................................................................
After cleaning and wire brushing the freshly pickled piece of metal, I begin the arduous task of sanding...

...and sanding, and sanding, preferably with at least 3-4 different fine grit sand papers.
I start with the lowest (600) grit and moving up to the highest (1200), sanding and polishing until my fingers are numb.

.......................................................................................................
After I'm satisfied with the hand shine I mark holes for the anchor jump rings. Measure twice, drill once!

...................................................................................................
I like drilling holes the old-old fashioned way. My air tool always seems to get away from me leaving large gashes in its wake, destroying the hand polish that numbs my fingers.

..............................................................................................................
I use a slightly larger drill bit to clean up the holes and take the burrs off.

............................................................................................................
I want the moon to have a high shine so it glows against the more matte copper wolf. I use jewelers rouge to grease up my polishing wheel and buff until I can see a weird, pock marked reflection of myself in its surface.

..................................................................................................
Getting all that black rouge gunk off the silver can be a chore. Here I am polishing it off with an old dishtowel.

..........................................................................................................
After polishing once more with a soft cloth and silver polish, the wolf is ready to howl!
The chain is stock, I cheat with chain, but add my own rings, patina and texture to make it more custom. Making chain is very time consuming (not cost effective), frustrating and requires a lot of patience.
Anyhow, here she is before silver polish:

and here she is after:
What do you think?
Llara was all jacked up on pain meds from dental surgery when I gave it to her, so I didn't get an accurate read on her enthusiasm level. A few days later I mentioned this and she said she thought it was perfect and would suit her boyfriend's mom well. I hope so!
What would you like to see me create next?
For more information on learning to silversmith or expand your artistic horizons visit the Art Academy of San Diego. I highly recommend Deanna Jacobsen, she's a talented silversmith in her own right!
This was so fascinating, Sandra! Thanks for sharing!
ReplyDeleteWow! This is so friggin cute! LOVE it! I'd like to see you make something with a bird motif next Tweet-tweet :-)
ReplyDeleteI have done some owl stuff, but I would love to try something like that. Off the top of my head, a peacock...layering the silver and copper would look really cool! Suggestions are always a good start to a great project! Thanks, Lisa!
ReplyDeleteGreat post, so interesting to see the effort that goes into making a beautiful thing like this.
ReplyDeleteJust came across you blog & I have to say I like it very much.
...xXx